arc scale zero
개요
Actions Runner Controller를 사용해서 Scale Zero 환경을 구성하는 방법을 설명합니다.
Actions Runner Controller의 Scale Zero는 웹훅 이벤트가 발생할 때만 러너가 스케일링되는 환경으로 평상시에는 러너가 0개로 유지됩니다. 이를 통해 러너 파드가 구동되는 워커노드(EC2)의 컴퓨팅 비용을 획기적으로 절감할 수 있습니다.
환경
- Github Enterprise Server 3.13 (EC2)
- Actions Runner Controller 버전: v0.27.6 (Chart version: 0.23.7)
- EKS 1.32
배경지식
Actions Runner Controller
Actions Runner Controller는 쿠버네티스 클러스터에서 GitHub Actions Runner를 관리하는 컨트롤러입니다. Actions Runner는 컨테이너 이미지로 제공되며, 컨테이너 이미지를 통해 쉽게 배포할 수 있습니다.
Actions Runner Controller의 스케일링
Actions Runner Controller는 두 가지 스케일링 방식을 지원합니다.
Pull-driven scaling과 Webhook-driven scaling를 구분하는 결정적 차이는 스케일링 트리거를 발생시키는 주체와 방식입니다:
- Pull-driven scaling은 Actions Runner Controller가 주기적으로 Github API를 폴링하여 스케일링을 결정합니다.
- Webhook-driven scaling은 Github이 이벤트 발생 시 즉시 웹훅으로 Actions Runner Controller에 알려 스케일링을 트리거합니다.
Actions Runner Controller 공식문서에서는 웹훅 기반 스케일링(Webhook-driven scaling) 방식을 권장하고 있습니다.
Pull-driven scaling
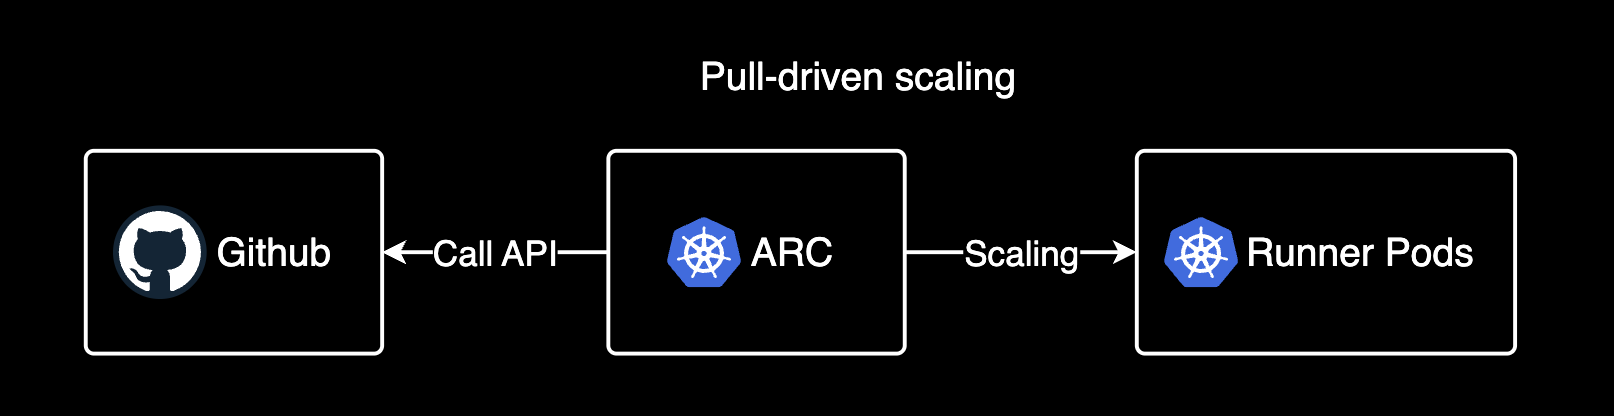
Actions Runner Controller가 Github API를 통해 러너의 스케일링을 진행하는 방식을 Pull-driven scaling이라고 합니다. 이 방식은 웹훅 이벤트를 받자마자 스케일링을 진행하는 Webhook-driven scaling과 달리 일정 시간마다 스케일링을 진행합니다. 따라서 반응 속도가 느리고, Github API의 Rate Limit 영향을 받아 스케일링을 진행하는 시간이 길어질 수 있습니다.
크게 2가지 스케일링 기준이 있습니다.
- PercentageRunnersBusy : 현재 실행중인 Runner의 비율을 기준으로 스케일링을 진행합니다. 최소 1개의 러너를 반드시 유지해야 한다는 제약이 있습니다.
- TotalNumberOfQueuedAndInProgressWorkflowRuns : 현재 대기중이거나 실행중인 워크플로우의 총 개수를 기준으로 스케일링을 진행합니다. Scale to zero는 가능하지만 Pull 기반이므로 Actions Runner Controller가 주기적으로 Github API를 호출하여 Queued 상태의 워크플로우를 확인하고 스케일링을 진행합니다.
Webhook-driven scaling
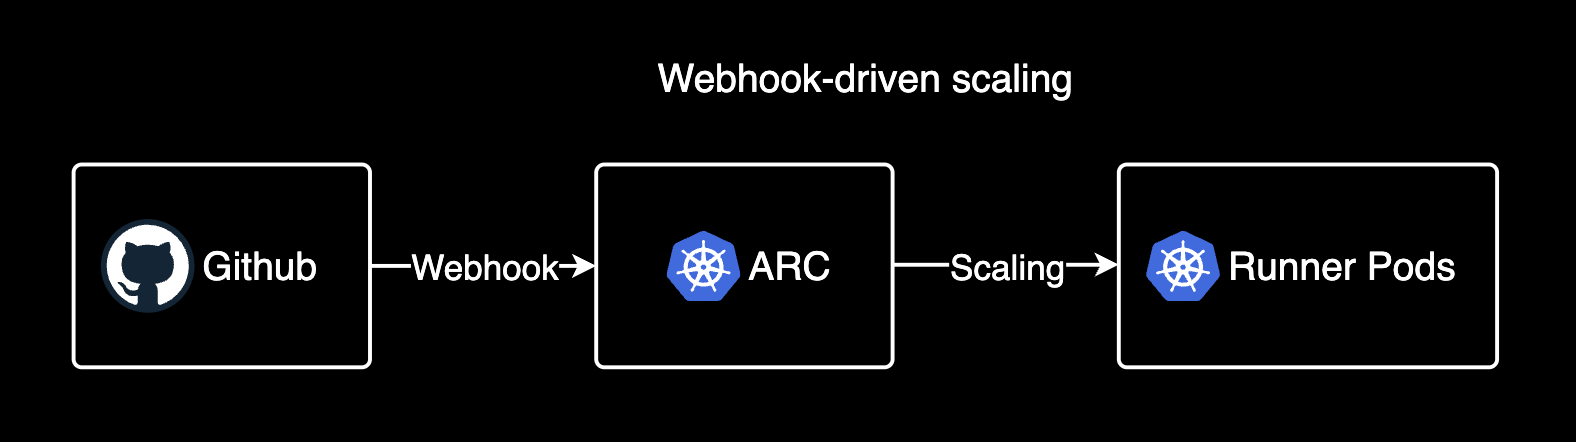
웹훅 기반 스케일링은 Github 서버가 웹훅 이벤트를 발생시키면 Actions Runner Controller가 웹훅 이벤트를 수신받아 스케일링을 진행하는 방식입니다. 이 방식은 웹훅 이벤트를 받자마자 스케일링을 진행하므로 반응 속도가 빠릅니다. 크게 3가지 장점이 있습니다.
- 웹훅 이벤트를 받자마자 ARC 웹훅 서버가 스케일링을 진행하므로 반응 속도가 빠릅니다.
- Actions Runner Controller 웹훅 서버 파드가 GHES가 보낸 웹훅 이벤트를 수신받아 스케일링을 수행하는 방식이기 때문에 Github API의 Rate Limit의 영향을 받지 않아 더 안전합니다.
- Scale to zero 설정이 가능하므로 평상시에는 러너가 0개로 유지되어 컴퓨팅 비용을 획기적으로 절감할 수 있습니다.
주의사항
ARC Deprecation
이 가이드에서 다루는 Actions Runner Controller는 업데이트 되지 않고, gha-runner-scale-set-controller로 대체되었으므로 새 프로젝트에서는 gha-runner-scale-set-controller로 Actions Runner를 운영하기를 적극 권장합니다. 자세한 사항은 Discussion #2775에서 확인 가능합니다.
---
title: Actions Runner Controller Migration
---
graph LR
    A[actions-runner-controller] --> C[Legacy/Deprecated]
    B[gha-runner-scale-set-controller] --> D[새 프로젝트 권장]
    A -.-> B
    E[_2023년 6월 30일부터 gha-runner-scale-set-controller는 GA로 전환_]

    style C fill:darkorange, color:white
    style D fill:green, color:white
    style E fill:transparent, stroke:none
참고로 gha-runner-scale-set-controller는 2023년 6월 30일에 GA(General Availability)로 전환되었습니다.
설정 가이드
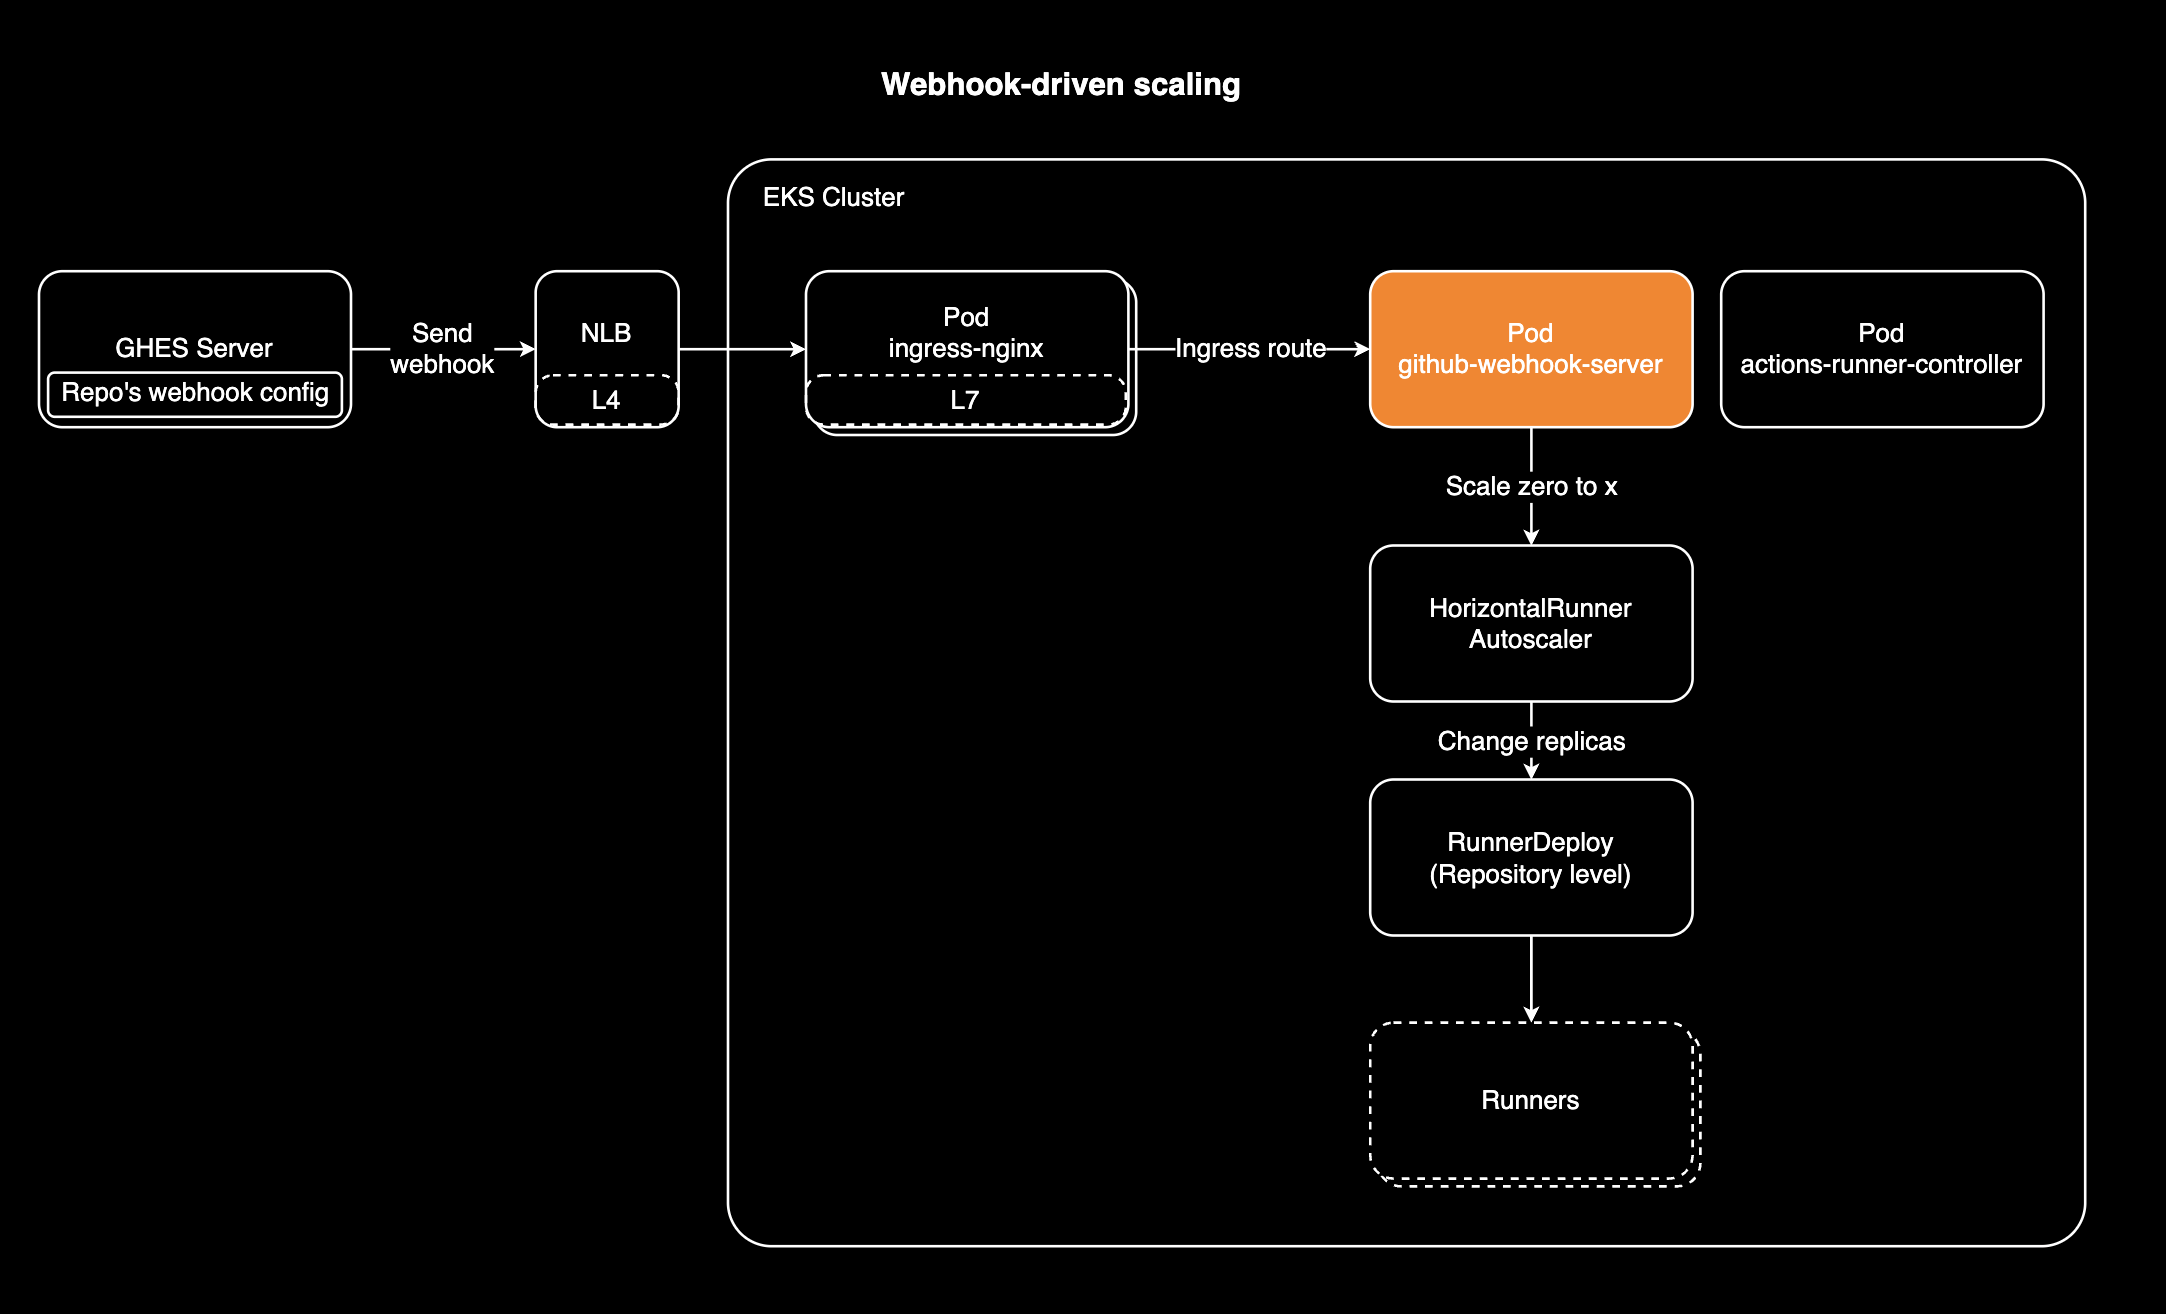
이 시나리오에서는 Webhook-driven scaling을 사용해서 Workflow Jobs 이벤트가 발생할 때만 러너가 스케일링되는 scale zero 환경을 구성합니다.
웹훅 서버 설정
웹훅 기반 스케일링을 사용하려면 먼저 Actions Runner Controller 파드와 별개로 githubWebhookServer 파드를 추가적으로 배포해야 합니다. 또한 Ingress를 통해 GHES가 웹훅 서버 파드에 접근할 수 있도록 해야 합니다.
Actions Runner Controller 차트 설정:
# charts/actions-runner-controller/values_my.yaml
githubWebhookServer:
  enabled: true
  replicaCount: 1
  useRunnerGroupsVisibility: true
  logFormat: text
  secret:
    enabled: true
    create: true
    name: "github-webhook-server"
    github_webhook_secret_token: ""
    github_token: "ghp_<YOUR_TOKEN>"
  imagePullSecrets: []
  nameOverride: ""
  fullnameOverride: ""
  serviceAccount:
    create: true
    annotations: {}
    name: ""
  podAnnotations: {}
  podLabels: {}
  podSecurityContext: {}
  securityContext: {}
  resources: {}
  nodeSelector: {}
  tolerations: []
  affinity: {}
  priorityClassName: ""
  service:
    type: ClusterIP
    annotations: {}
    ports:
      - port: 80
        targetPort: http
        protocol: TCP
        name: http
    loadBalancerSourceRanges: []
  ingress:
    enabled: true
    ingressClassName: "nginx"
    annotations: {}
    hosts:
      - host: your.domain.com
        paths:
          - path: /actions-runner-controller-github-webhook-server
            pathType: Prefix
        extraPaths: []
Webhook-driven scaling의 경우 Github Enterprise Server는 Actions Runner Controller와 별개인 ARC Webhook 서버 파드에 웹훅을 전달해야 하므로 별도의 Ingress를 설정해서 외부에서 접근할 수 있도록 구성해야 합니다.
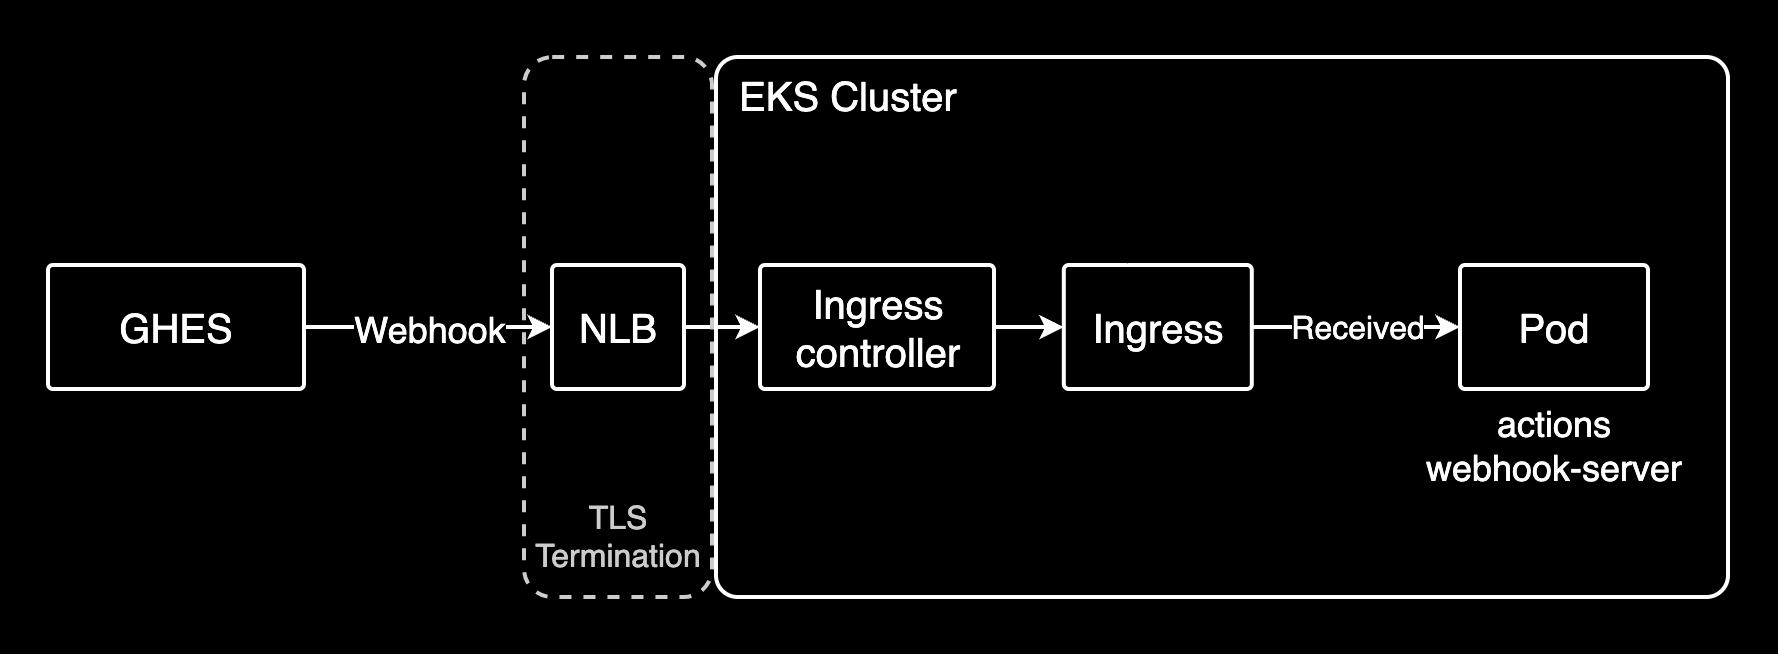
사용자의 로컬 환경이나 Github Enterprise Server에서 다음 명령을 실행해 웹훅 서버까지의 네트워크 연결을 확인할 수 있습니다. 여기서 your.domain.com은 사용자의 ARC 웹훅 서버의 도메인이며, 사용자의 환경에 맞게 변경해야 합니다.
nc -zv your.domain.com 443
curl https://your.domain.com/actions-runner-controller-github-webhook-server
러너 리소스 설정
HorizontalRunnerAutoscaler 리소스 설정:
apiVersion: actions.summerwind.dev/v1alpha1
kind: HorizontalRunnerAutoscaler
metadata:
  name: scalezero-test-runner-hra
  namespace: actions-runner
spec:
  # When using webhook-driven scaling, setting minReplicas to 0 enables scale-to-zero functionality.
  # Runners will scale up from 0 only when workflow jobs are triggered via webhook events.
  minReplicas: 0
  maxReplicas: 5
  scaleTargetRef:
    kind: RunnerDeployment
    name: scalezero-test-runner
  scaleUpTriggers:
  - amount: 1
    duration: 5m
    githubEvent:
      workflowJob: {}
HRA의 spec.scaleUpTriggers는 웹훅 이벤트가 발생했을 때 러너가 증가하는 방식을 결정합니다. 이 시나리오에서는 웹훅 이벤트가 발생했을 때 러너가 1개씩 증가하도록 설정합니다. 한 번 생성된 러너는 duration 기간동안 유지되며, 이 기간이 지나면 러너가 삭제됩니다.
runner를 scale zero로 설정하려면 spec.minReplicas를 0으로 설정해야 합니다. 이 설정은 웹훅 이벤트가 발생했을 때만 러너를 생성하므로 평상시에는 러너가 0개로 유지됩니다. 이 방식을 사용하면 러너 컴퓨팅 비용을 획기적으로 절감할 수 있습니다.
RunnerDeployment 설정:
apiVersion: actions.summerwind.dev/v1alpha1
kind: RunnerDeployment
metadata:
  name: scalezero-test-runner
  namespace: actions-runner
spec:
  template:
    spec:
      image: ""
      labels:
      - self-hosted  # Explicitly add this label on GHES
      - linux        # Explicitly add this label on GHES
      - test-runner
      repository: org-name/repo-name
쿠버네티스 클러스터에서 self-hosted로 실행되는 Actions 러너를 실행할 때는 RunnerDeployment에 self-hosted와 linux 라벨을 명시적으로 추가해야 합니다.
웹훅 서버 파드에서 웹훅 이벤트는 정상적으로 수신되지만 러너가 스케일링되지 않는 경우 다음과 같은 에러가 발생합니다.
Scale target not found. If this is unexpected, ensure that there is exactly one repository-wide or organizational runner deployment that matches this webhook event. If --watch-namespace is set ensure this is configured correctly.이는 웹훅 서버가 라벨과 매칭되는 적절한 러너를 찾지 못했다는 의미입니다. 이 문제는 위에 언급한 것처럼 self-hosted와 linux 라벨을 명시적으로 runnerdeployment 리소스에 추가하면 해결됩니다. 그래도 해결되지 않는 경우 다른 라벨이 선언된 것은 아닌지, 러너 설정과 완벽하게 매칭되는지 확인해야 합니다.
Github Webhook 설정
Github 레포지터리에 웹훅을 설정하는 방법은 다음과 같습니다.
- GitHub repo/org의 Settings → Webhooks → Add webhook 이동
- 다음 정보 입력:
- Payload URL: https://your.domain.com/actions-runner-controller-github-webhook-server
- Content type: application/json 선택
- Events: "Let me select individual events" → "Workflow Jobs" 선택: Workflow job queued, waiting, in progress, or completed on a repository 이벤트가 발생하면 웹훅을 발송
- Active 체크박스 체크 후 Add Webhook 클릭

- GitHub에서 ping 이벤트 발송 → Webhooks 페이지에서 초록색 V 표시로 정상 작동 확인
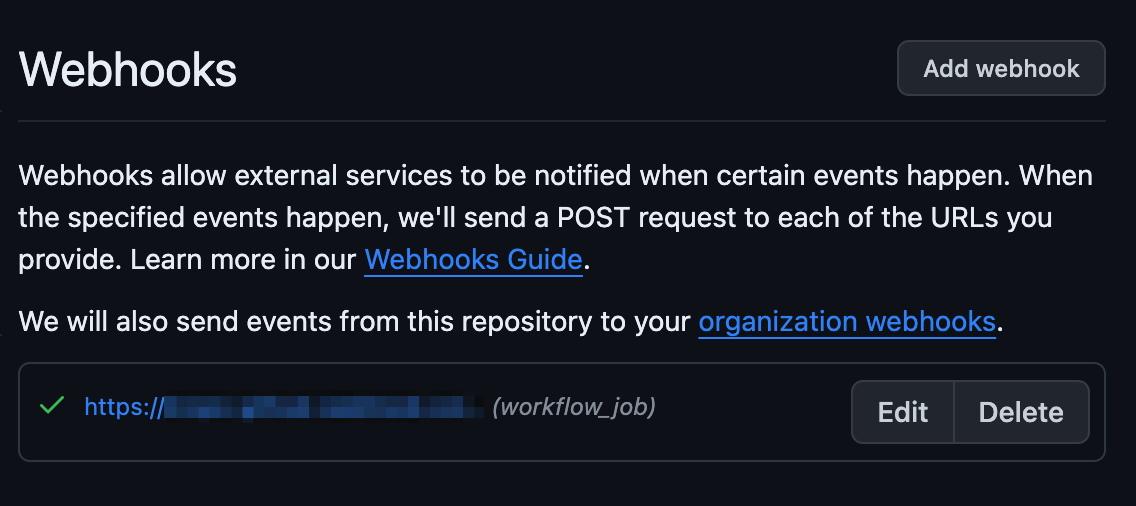
- 확인 완료 후 HorizontalRunnerAutoscaler 리소스 생성/업데이트 진행
관련자료
- ARC: Webhook-driven scaling
- Cannot scale from zero with TotalNumberOfQueuedAndInProgressWorkflowRuns metric #2850
Github: