Hugo x github 블로그 설치 방법
개요
hugo 기반의 깃허브 블로그를 구축할 수 있습니다.
환경
- Hardware : MacBook Pro (13-inch, M1, 2020)
- OS : macOS Big Sur 11.5
- Shell : zsh
- Hugo : hugo v0.86.0+extended darwin/arm64
- brew를 이용해서 설치함
- brew : Homebrew 3.2.5
배경지식
Hugo
Hugo는 Go 언어로 작성된 정적 웹사이트 생성기Static website generator입니다. 정적 웹사이트 생성기란 서버 측에서 동적으로 생성되는 것이 아니라 미리 만들어진 파일들을 서버에 올려놓고 사용자가 요청할 때마다 그 파일들을 보여주는 것입니다.
Hugo를 이용하면 누구나 간편하게 마크다운과 같은 마크업 언어를 이용하여 웹사이트를 작성하고, 테마와 템플릿을 이용하여 디자인을 꾸밀 수 있습니다.
또한, Hugo는 다국어 지원과 SEO 최적화 등의 기능도 제공하므로 사용자 친화적인 웹사이트를 만들 수 있습니다. Hugo는 속도가 빠르기 때문에 대규모 웹사이트를 만드는 데에도 적합합니다.
Github Pages
깃허브 페이지는 개인 블로그나 포트폴리오 등을 손쉽게 만들 수 있는 무료 호스팅 서비스이므로, Hugo와 깃허브 페이지를 이용해서 테크 블로그를 만드는 것은 매우 인기 있는 방법 중 하나입니다.
Hugo를 이용하면 로컬 환경에서 웹사이트를 개발한 후, 정적 파일들을 생성하여 깃허브 레포지토리에 업로드하면 끝입니다. 이렇게 생성된 정적 파일들은 깃허브 페이지에서 호스팅되어 다른 사용자가 접근할 수 있습니다.
준비사항
- 패키지 관리자인 Homebrew가 설치되어 있는 macOS 환경
- Github 계정
- 블로그용 Github Repository 생성
- 깃허브 블로그용 레포지터리 생성 방법은 Github 공식문서 Github Pages 사이트 만들기를 참고합니다.
블로그 만드는 방법
1. Hugo 설치
Hugo 블로그를 생성하려면 로컬에 hugo를 먼저 설치합니다.
macOS용 패키지 관리자인 Homebrew를 사용중인 경우, 아래 명령어로 쉽게 hugo를 설치할 수 있습니다.
만약 Homebrew가 설치되어 있지 않다면 brew 공식홈페이지를 방문해서 설치한다.
brew를 이용한 hugo 설치
$ brew install hugo
hugo 버전 확인
정상적으로 hugo 설치를 완료한 경우 hugo의 버전이 출력됩니다.
$ hugo version
hugo v0.86.0+extended darwin/arm64 BuildDate=unknown
2. 사이트 생성
프로젝트 폴더를 만들 경로로 이동합니다.
제 경우는 github_repos 라는 폴더 안에 모든 레포지터리를 관리하는 구성이기 때문에 github_repos 폴더 안에 blog 폴더를 따로 생성하기로 결정했습니다.
현재 작업 구성은 아래와 같습니다.
$ pwd
/Users/ive/github_repos

## 트리 구조로 본 프로젝트 경로
/
└── Users
    └── ive
        └── github_repos
            └── blog <--- 내가 새로 만들 블로그 폴더
사이트 생성 명령어 형식
$ hugo new site <프로젝트 이름(폴더명)>
내가 실행한 명령어
사이트 생성 전에 현재 작업경로를 미리 확인합니다.
$ pwd
/Users/ive/github_repos
사이트 생성
blog라는 이름의 디렉토리를 현재 경로에 생성하고, 해당 디렉토리 안에 블로그 환경을 자동 구성합니다.
$ hugo new site blog
Congratulations! Your new Hugo site is created in /Users/ive/github_repos/blog.

Just a few more steps and you're ready to go:

1. Download a theme into the same-named folder.
   Choose a theme from https://themes.gohugo.io/ or
   create your own with the "hugo new theme <THEMENAME>" command.
2. Perhaps you want to add some content. You can add single files
   with "hugo new <SECTIONNAME>/<FILENAME>.<FORMAT>".
3. Start the built-in live server via "hugo server".

Visit https://gohugo.io/ for quickstart guide and full documentation.
Congratulations! 메세지가 나오고 정상적으로 blog 폴더가 생성된 걸 확인할 수 있습니다.
$ pwd
/Users/ive/github_repos
$ ls
PycharmProjects            nodejs-with-docker-toyproj
blog                       ps
gs-gradle                  seyslee
jenkins-pipeline-toyproj
blog 디렉토리가 새로 생성됩니다.
현재 hugo 블로그 테마는 hugo-theme-codex를 사용중입니다.
주의사항
hugo-theme-codex는 2021년 7월을 마지막으로 업데이트가 중지된 블로그 테마입니다.
blog 프로젝트 디렉토리로 이동합니다.
$ pwd
/Users/ive/github_repos/blog
blog 디렉토리 안에서 git init 명령어를 실행해 git 환경을 구성합니다.
$ git init
서브모듈(Submodule)의 개념
Git의 서브모듈(Submodule)이란 하나의 저장소(Repository) 안에 있는 또 다른 별개의 저장소입니다.
보통 다른 원격 저장소를 가져와(Pull) 서브모듈로 사용합니다.
테마 깃허브 저장소를 서브모듈로 가져오기
아래 명령어는 hugo-theme-codex 테마 깃허브 저장소를 내 저장소 내 서브모듈로 가져오는 명령어입니다.
$ git submodule add https://github.com/jakewies/hugo-theme-codex.git themes/hugo-theme-codex
.
├── archetypes
├── content
├── data
├── layouts
├── resources
├── static
└── themes
    └── hugo-theme-codex <---[submodule]--- https://github.com/jakewies/hugo-theme-codex
git submodule 명령어를 실행해 submodule 목록이 생성된 걸 확인합니다.
$ git submodule
 9e911e331c90fcd56ae5d01ae5ecb2fa06ba55da themes/hugo-theme-codex (v1.6.0)
설정파일(config.toml) 생성
그 다음 themes/hugo-theme-codex/exampleSite/config.toml 파일을 복사해 초기에 생성된 config.toml 에 덮어씁니다.
.
├── archetypes
├── config.toml <--- 초기에 생성된 config.toml
├── [...]
└── themes
    └── hugo-theme-codex
        └── exampleSite
            └── config.toml <--- 복사할 config.toml
교체한 config.toml 설정파일을 열어보면 맨 윗줄에 themesDir 값이 있습니다.
이 라인과 주석을 삭제하고 저장한다.
# REMOVE THIS
themesDir = "../../"
추가적인 블로그 설정 변경은 hugo-theme-codex 공식문서를 참고합니다.
index 페이지 설정content/_index.md 파일을 생성하여 사이트의 초기화면(index) 페이지를 구성할 수 있습니다..md 확장자는 markdown 파일을 의미합니다.
_index.md 파일 위치는 다음과 같습니다.
.
├── archetypes
├── config.toml
├── [...]
└── content
    └── _index.md <--- 메인 페이지 설정파일
_index.md 파일 내용은 다음과 같이 작성합니다.
---
heading: "Hi, I'm Codex"
subheading: "A minimal blog theme for hugo."
handle: "hugo-theme-codex"
---
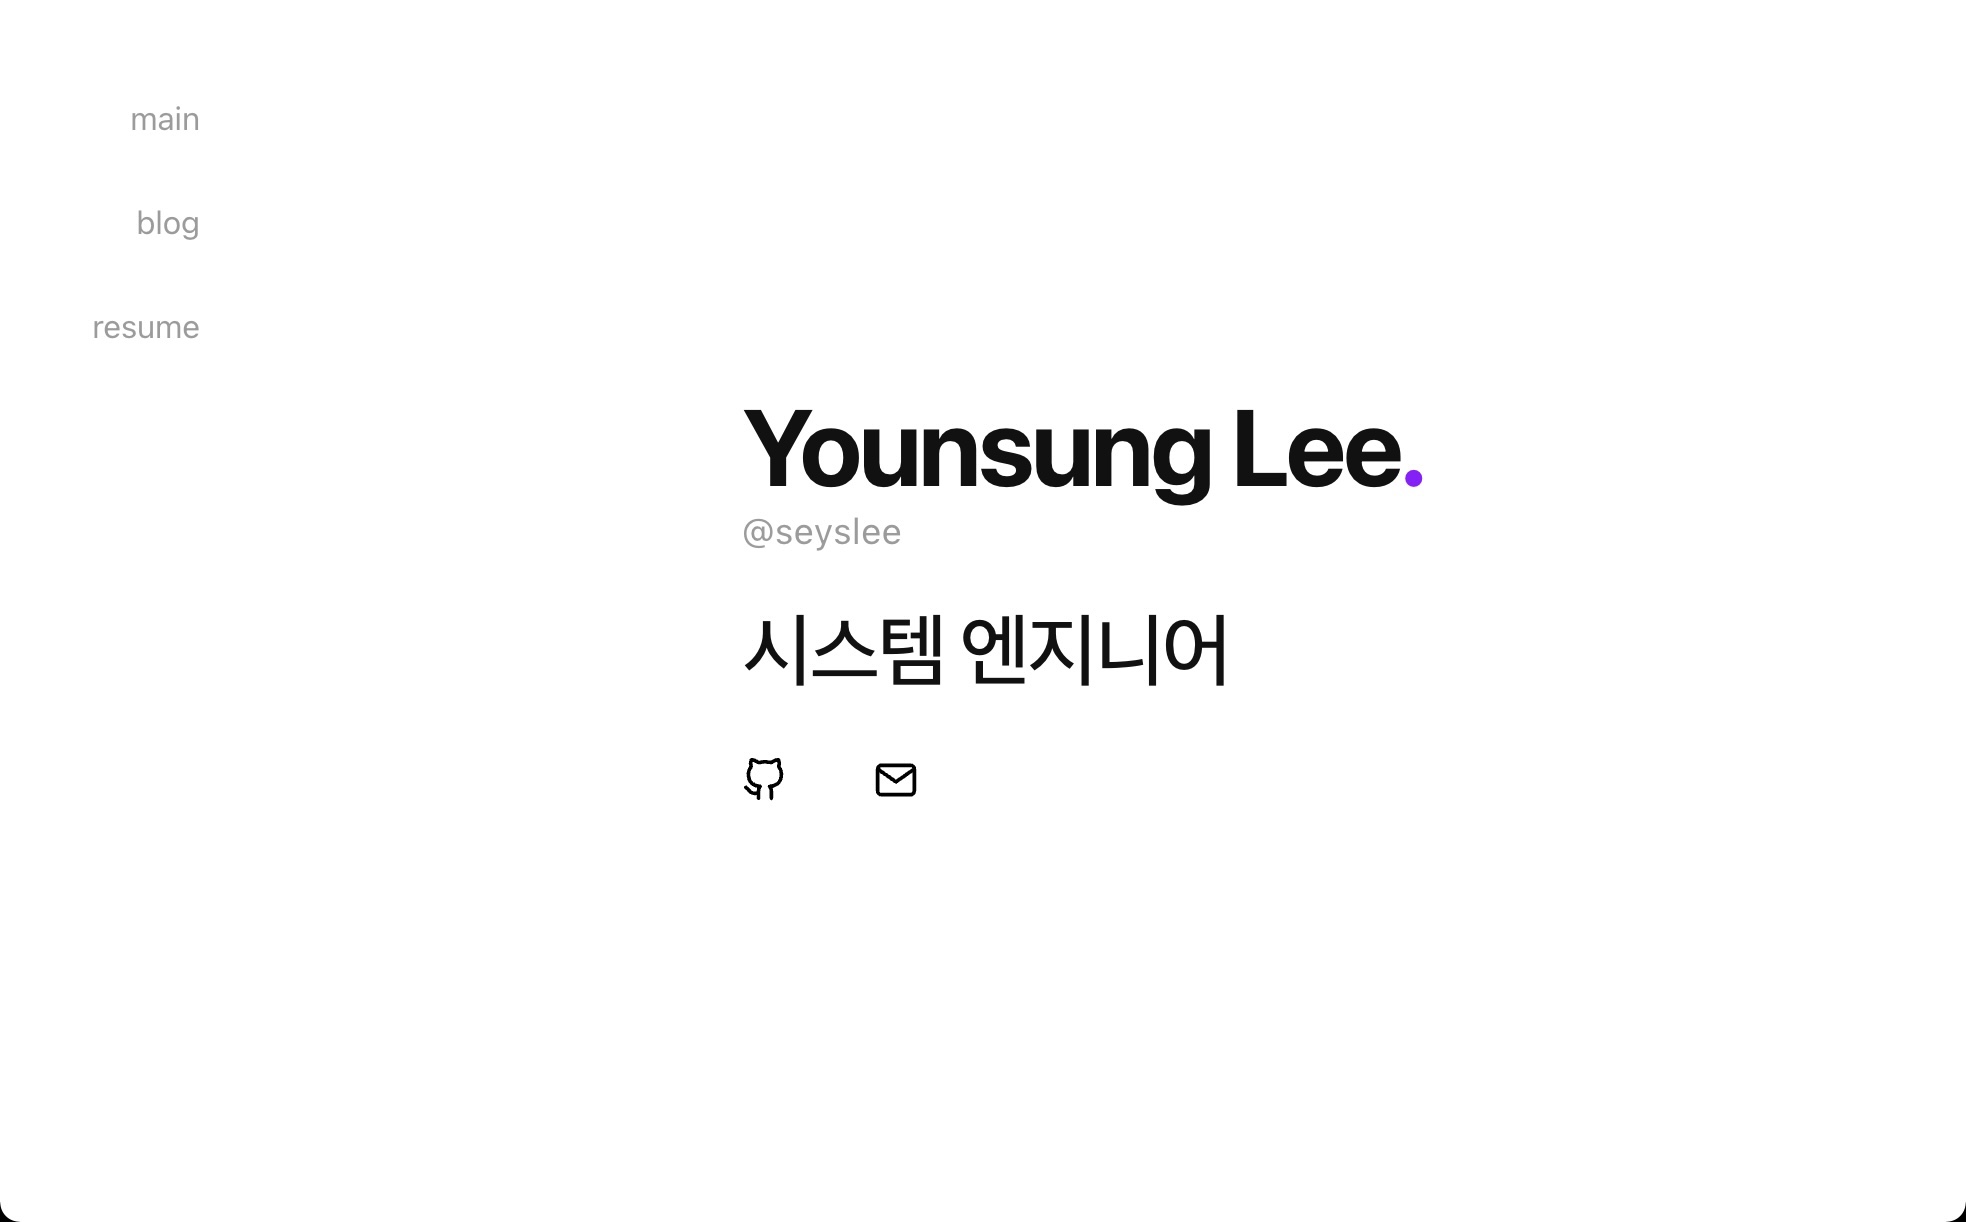
이후 본인의 환경에 맞게 수정합니다.
---
heading: "Younsung Lee"
subheading: "시스템 엔지니어"
handle: "seyslee"
---
테스트
빌드하기 전에 테스트 목적으로 로컬 환경에서 hugo 웹서버를 미리 띄웁니다.
$ hugo server -D
hugo server : 생성한 페이지를 빌드하기 전, localhost 에서 미리 확인해보기 위한 웹서버 실행 명령어.
-D: draft 속성이 true 인 글도 보이도록 하는 옵션
Start building sites …
hugo v0.86.0+extended darwin/arm64 BuildDate=unknown

                   | EN
-------------------+-----
  Pages            | 23
  Paginator pages  |  0
  Non-page files   |  0
  Static files     | 12
  Processed images |  0
  Aliases          |  0
  Sitemaps         |  1
  Cleaned          |  0

Built in 19 ms
Watching for changes in /Users/ive/github_repos/blog/{archetypes,content,data,layouts,static,themes}
Watching for config changes in /Users/ive/github_repos/blog/config.toml
Environment: "development"
Serving pages from memory
Running in Fast Render Mode. For full rebuilds on change: hugo server --disableFastRender
Web Server is available at http://localhost:1313/ (bind address 127.0.0.1)
Press Ctrl+C to stop
마지막에 Web Server is available at http://localhost:1313/ 메세지가 출력되면 정상적으로 로컬 웹서버 실행이 완료된 것입니다.
인터넷 브라우저를 열어 http://localhost:1313/으로 접속해서 Index 페이지가 잘 수정되었는지 확인합니다.
페이지 확인을 한 후 다시 터미널로 돌아와서 Ctrl + C 키를 눌러 hugo 웹 서버를 종료합니다.
4. 리모트 추가
명령어 형식
$ git remote add origin <블로그용 Github 레포지터리의 URL>
git remote: 현재 프로젝트에 등록된 리모트 저장소를 확인하는 명령어. 이 명령어는 리모트 저장소의 단축 이름을 보여줍니다. 레포지터리를 복제(Clone)하면origin이라는 리모트 저장소가 자동으로 등록되기 때문에origin이라는 이름을 볼 수 있습니다.origin: 축약형 이름을 말합니다.- 블로그 작성용 레포지터리의 URL :
https://github.com/<GITHUB_USERNAME>/<REPOSITORY_NAME>
내가 실행한 명령어
제 Github 유저네임는 iiivvveee, 블로그 작성용 레포지터리의 이름은 blog 입니다.
완성된 깃허브 블로그용 레포지터리 URL 주소 다음과 같습니다.
https://github.com/iiivvveee/blog
                   --------- ----
                   USERNAME  REPOSITORY NAME
각자 완성된 블로그용 레포지터리 URL 주소를 넣어 원격 저장소를 등록합니다.
$ git remote add origin https://github.com/iiivvveee/blog
현재 로컬 레포지토리와 연결된 원격 저장소(remote repository)의 이름과 URL을 출력합니다.
$ git remote -v
origin    https://github.com/iiivvveee/blog (fetch)
origin    https://github.com/iiivvveee/blog (push)
이 명령어를 통해 로컬 레포지토리가 현재 어떤 원격 저장소와 연결되어 있는지 확인할 수 있습니다.-v 옵션을 사용하면 출력되는 URL에 추가로 fetch와 push를 위한 URL도 함께 출력됩니다.
5. 서브모듈 추가
자신의 블로그 빌드 결과물인 public 디렉토리를 서브모듈로 추가합니다.
$ git submodule add -b master https://github.com/iiivvveee/iiivvveee.github.io.git public
전체 서브모듈 목록을 확인합니다.
$ git submodule
-a3a5abf8f39e7b6dcaf49431c90f4e963591e35d public
 9e911e331c90fcd56ae5d01ae5ecb2fa06ba55da themes/hugo-theme-codex (v1.6.0)
public 폴더가 submodule로 추가된 걸 확인할 수 있습니다.
6. 테스트
hugo server : 생성한 페이지를 빌드하기 전, localhost 에서 미리 확인해보기 위한 웹서버 실행 명령어.
-D: draft 속성이 true 인 글도 보이도록 하는 옵션
$ hugo server -D
Start building sites …
hugo v0.86.0+extended darwin/arm64 BuildDate=unknown

                   | EN
-------------------+-----
  Pages            | 10
  Paginator pages  |  0
  Non-page files   |  0
  Static files     | 12
  Processed images |  0
  Aliases          |  0
  Sitemaps         |  1
  Cleaned          |  0

Built in 27 ms
Watching for changes in /Users/ive/github_repos/blog/{archetypes,content,data,layouts,static,themes}
Watching for config changes in /Users/ive/github_repos/blog/config.toml
Environment: "development"
Serving pages from memory
Running in Fast Render Mode. For full rebuilds on change: hugo server --disableFastRender
Web Server is available at http://localhost:1313/ (bind address 127.0.0.1)
로컬에서 Hugo 웹서버 포트는 TCP 1313을 사용합니다.
Built in 27 ms

...

Change detected, rebuilding site.
2021-07-31 01:36:42.676 +0900
Source changed "/Users/ive/github_repos/blog/content/blog/installing-hugo-github-blog.md": CREATE
Total in 7 ms
이 때, Hugo의 강점인 빠른 속도를 체감할 수 있습니다. 27ms 만에 로컬 빌드가 완료됩니다.
개발환경에서 테스트하는 동안 Hugo는 실시간으로 변경사항을 체크해 반영하는 기능도 있습니다.
hugo server는 기본적으로 사용자가 변경한 사항이 있는지 파일을 항상 감시하고 사이트를 자동으로 재구축하는 기능을 갖고 있습니다.
즉, 로컬에서 블로그의 게시글을 한 글자라도 수정하면 그 즉시 hugo server가 수정사항을 반영해서 변경된 웹사이트로 다시 보여준다.
글을 작성하는 사람 입장에서 내가 입력한 변경사항을 바로 확인할 수 있어서 매우 편리합니다.
브라우저를 실행한 후 로컬 Hugo 웹서버 주소인 http://localhost:1313/으로 접속합니다. 자신이 만든 블로그 화면이 출력됩니다.
7. 게시글 작성
새 게시글을 생성할 때는 아래 hugo new 명령어를 사용합니다.
명령어 형식
$ hugo new blog/<POST_FILE_NAME>.md
실제 실행한 명령어
$ hugo new blog/new-post.md
/Users/ive/github_repos/blog/content/blog/new-post.md created
게시글이 생성되는 경로
hugo-theme-codex 테마 기준으로 게시글은 ./content/blog/ 디렉토리 아래에 생성되어야 정상적으로 표출됩니다.
.
├── archetypes
├── content
│   └── blog
│       └── new-post.md <--- 새로 생성된 게시글
├── data
├── layouts
├── public
├── resources
├── static
├── deploy.sh
└── themes
    └── hugo-theme-codex
사용중인 블로그 테마에 따라 게시글이 위치해야하는 디렉토리 경로는 다를 수 있습니다.
각 테마의 가이드 문서를 정독한 후 게시글을 해당 경로에 맞게 생성합니다.
글 작성시 주의사항
모든 게시글 마크다운 파일은 글의 메타 데이터를 담고 있는 Front Matter로 시작됩니다.
---
title: "Hugo x github 블로그 설치 방법"
date: 2021-07-31T00:29:09+09:00
lastmod: 2021-07-31T00:33:04+09:00
slug: ""
description: "Hugo 와 Github 를 사용해 블로그를 구축하는 방법"
keywords: []
draft: false
tags: ["Linux", "OS"]
math: false
toc: true
---

여기서부터는 게시글 내용입니다.

...
Front Matter 설명
hugo-theme-codex 테마 기준으로 Front Matter 값들을 설명합니다.
- title : 게시글의 제목
- date : 게시글의 최초 작성시간
- lastmod : 게시글의 마지막 수정시간
- description : 게시글의 설명글. 검색엔진 최적화(SEO)를 위해서 게시글 제목(title)에 담긴 내용을 풀어서 적어놓습니다.
- draft : 작성중인지 작성완료인지 구분.
draft: true일 경우, 실제 블로그 웹사이트에서 해당 게시글은 숨김처리 됩니다. 작성중인 글을 로컬 환경 뿐만 아니라 실제 환경에서도 공개하고 싶다면 반드시draft: false값으로 설정합니다. - tags : 게시글의 태그
- toc : 목차table of content의 줄임말. Front Matter의 값이
toc: true일 경우 마크다운 기반의 게시글 목차를 정리해서 보여줍니다.
8. 배포 스크립트 작성
앞으로 Hugo 블로그를 관리하려면 2개의 레포지터리에 모두 Commit 해야합니다.
# Repository name : iiivvveee.github.io
$ cd public
$ git add .
$ git commit -m "First commit"
$ git push origin master

# Repository name : blog
$ cd ..
$ git add .
$ git commit -m
$ git push origin master
구분된 레포지터리 경로마다 들어가서 commit과 push를 2번씩 해야하는 불편함이 있습니다.
2개의 레포지터리 관리는 복잡하고 귀찮으니 컨텐츠 배포를 자동화하는 스크립트를 작성합니다.
블로그 루트 디렉토리 안에 deploy.sh 스크립트 파일을 생성합니다.
.
├── archetypes
├── content
├── data
├── layouts
├── public
├── resources
├── static
├── deploy.sh <--- 우리가 작성할 배포 스크립트
└── themes
    └── hugo-theme-codex
deploy.sh 의 내용은 아래와 같이 작성합니다.
7번 라인에 hugo -t <자신이 사용하는 테마 이름> 명령어는 자신의 환경에 맞게 수정합니다.
#!/bin/bash

echo -e "\033[0;32mDeploying updates to GitHub...\033[0m"

# Build the project.
# hugo -t <여러분의 테마>
hugo -t hugo-theme-codex

# Go To Public folder, sub module commit
cd public
# Add changes to git.
git add .

# Commit changes.
msg="rebuilding site `date`"
if [ $# -eq 1 ]
  then msg="$1"
fi
git commit -m "$msg"

# Push source and build repos.
git push origin master

# Come Back up to the Project Root
cd ..

# blog 저장소 Commit & Push
git add .

msg="rebuilding site `date`"
if [ $# -eq 1 ]
  then msg="$1"
fi
git commit -m "$msg"

git push origin master
9. 배포 실행
배포용 쉘스크립트 실행을 위해 블로그 프로젝트 폴더의 루트 디렉토리로 이동합니다.
$ pwd
/Users/ive/github_repos/blog
배포 스크립트deploy.sh가 현재 디렉토리에 존재하는 지 확인합니다.
$ ls -lh
total 16
drwxr-xr-x   3 ive  staff    96B  7 30 20:00 archetypes
-rw-r--r--   1 ive  staff   2.5K  1  2 22:41 config.toml
drwxr-xr-x   6 ive  staff   192B 12  7 23:45 content
-rwxr-xr-x@  1 ive  staff   585B  1  2 22:05 deploy.sh
drwxr-xr-x   5 ive  staff   160B 12  8 00:39 layouts
drwxr-xr-x  16 ive  staff   512B  1  6 21:32 public
drwxr-xr-x   4 ive  staff   128B  8  1 14:43 resources
drwxr-xr-x   5 ive  staff   160B  1  2 23:22 static
drwxr-xr-x   4 ive  staff   128B  7 30 20:03 themes
deploy.sh 파일이 현재 경로에 있습니다.
그 다음 sh 명령어로 배포 스크립트 파일deploy.sh을 실행합니다.
macOS는 터미널에서 sh 명령어를 기본적으로 지원합니다.
$ sh deploy.sh
bash deploy.sh
Deploying updates to GitHub...
Start building sites …
hugo v0.86.0+extended darwin/arm64 BuildDate=unknown

                   | EN
-------------------+-----
  Pages            | 14
  Paginator pages  |  0
  Non-page files   |  0
  Static files     | 12
  Processed images |  0
  Aliases          |  0
  Sitemaps         |  1
  Cleaned          |  0

Total in 33 ms
[...]
remote: Resolving deltas: 100% (5/5), completed with 5 local objects.
To https://github.com/iiivvveee/blog
   fa10865..e13e834  master -> master
정상적으로 빌드된 블로그 결과물이 깃허브 저장소에 업로드됩니다.
더 나아가서
댓글 기능 추가하기
깃허브 블로그는 댓글 기능을 기본적으로 지원하지 않습니다.
Utterances 플러그인을 이용해서 블로그 댓글 기능을 추가하고 싶다면 이 글을 참고하면 된다.
참고자료
HUGO Quick Start 공식문서
블로그 구축기 1 (Hugo + github.io)
블로그 구축기 (1) Hugo + Github으로 개인 블로그 만들기